- Compatible XF Versions
- 1.2
- 1.3
- 1.4
- 1.5
Description:
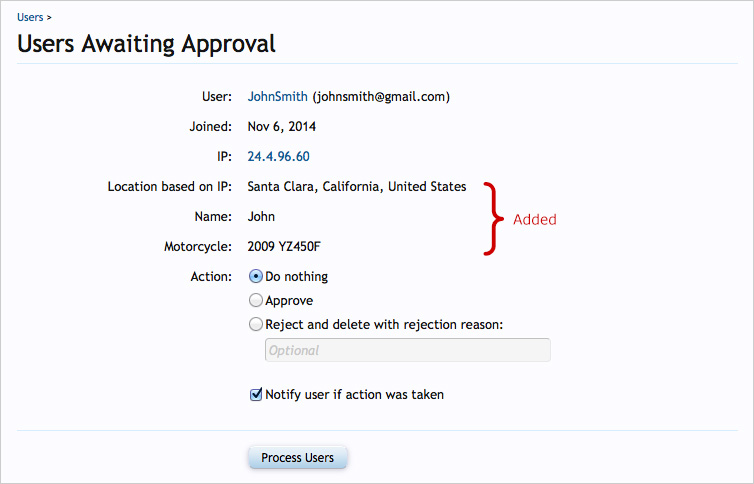
Adds Custom User Fields to Users Awaiting Approval page.
(Example of Users Awaiting Approval page)

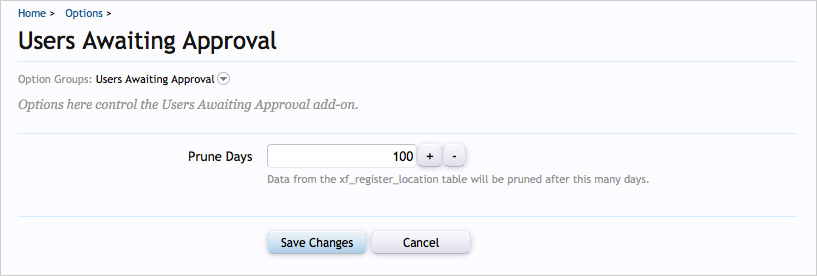
(Example of Options page)

Features:
The andy_user_moderate template will need to be edited. This requires development mode which is done by adding the following to your config.php file:
PHP:
$config['debug'] = true;
Example of andy_user_moderate template which is located here:
Admin CP -> Development -> Admin Templates
Code:
<xen:title>{xen hrase users_awaiting_approval}</xen:title>
<xen:form action="{xen:adminlink 'users/moderated/update'}">
<xen:foreach loop="$users" value="$user">
<fieldset>
<xen:controlunit label="{xen hrase user}:"><a href="{xen:adminlink users/edit, $user}" target="_blank">{$user.username}</a> ({$user.email})</xen:controlunit>
<xen:controlunit label="{xen hrase joined}:"><xen:datetime time="{$user.register_date}" /></xen:controlunit>
<xen:if is="{$user.ip}">
<xen:controlunit label="{xen hrase ip}:"><a href="{xen:link misc/ip-info, '', 'ip={$user.ip}'}" target="_blank">{$user.ip}</a> <xen:if is="{$user.ipHost}">({$user.ipHost})</xen:if></xen:controlunit>
</xen:if>
<xen:controlunit label="Location based on IP:">{$user.location}</xen:controlunit>
<xen:controlunit label="Name:">{$user.customFields.name}</xen:controlunit>
<xen:controlunit label="Motorcycle:">{$user.customFields.motorcycle}</xen:controlunit>
<xen:if is="{$user.spamDetails}">
<xen:controlunit label="{xen hrase spam_log}:"><ul>
<xen:foreach loop="{$user.spamDetails}" value="{$detail}">
<li>{xen:escape $detail, false}</li>
</xen:foreach>
</ul></xen:controlunit>
</xen:if>
<xen:radiounit label="{xen hrase action}:" name="users[{$user.user_id}][action]">
<xen ption value="none" selected="true">{xen
 hrase do_nothing}</xen
 ption>
<xen ption value="approve">{xen
 hrase approve}</xen
 ption>
<xen ption value="reject">
<xen:label>{xen hrase reject_and_delete_with_rejection_reason}:</xen:label>
<xen:textbox placeholder="{xen hrase optional}" name="users[{$user.user_id}][reject_reason]" size="45" />
</xen ption>
</xen:radiounit>
<xen:checkboxunit label="">
<xen ption name="users[{$user.user_id}][notify]" selected="!{$user.spamDetails}">{xen
 hrase notify_user_if_action_was_taken}</xen
 ption>
</xen:checkboxunit>
</fieldset>
</xen:foreach>
<xen:submitunit save="{xen hrase process_users}" />
</xen:form>
The code shown in red is what I use on my forum. If you don't have any custom user fields then delete this code. Otherwise if you wish to show your own custom user field code(s) which are filled in during registration, you will want to use my example and edit the template code to match your custom user Field ID names. For example change "name" and "motorcycle" to Field ID's that you use.
Database:
A table called xf_register_location is created in your database.
Adds Custom User Fields to Users Awaiting Approval page.
(Example of Users Awaiting Approval page)

(Example of Options page)

Features:
- Custom User Fields can be added.
- Shows location based on IP address.
- Download usersawaitingapproval_v1.5.zip and unzip it.
- Upload the Andy folder to your server. The correct location is library/Andy.
- From your Admin Control Panel, go to the "Install Add-on" page.
- Upload the addon-UsersAwaitingApproval_v1.5.xml file
- Click the Install Add-on button.
The andy_user_moderate template will need to be edited. This requires development mode which is done by adding the following to your config.php file:
PHP:
$config['debug'] = true;
Example of andy_user_moderate template which is located here:
Admin CP -> Development -> Admin Templates
Code:
<xen:title>{xen
<xen:form action="{xen:adminlink 'users/moderated/update'}">
<xen:foreach loop="$users" value="$user">
<fieldset>
<xen:controlunit label="{xen
<xen:controlunit label="{xen
<xen:if is="{$user.ip}">
<xen:controlunit label="{xen
</xen:if>
<xen:controlunit label="Location based on IP:">{$user.location}</xen:controlunit>
<xen:controlunit label="Name:">{$user.customFields.name}</xen:controlunit>
<xen:controlunit label="Motorcycle:">{$user.customFields.motorcycle}</xen:controlunit>
<xen:if is="{$user.spamDetails}">
<xen:controlunit label="{xen
<xen:foreach loop="{$user.spamDetails}" value="{$detail}">
<li>{xen:escape $detail, false}</li>
</xen:foreach>
</ul></xen:controlunit>
</xen:if>
<xen:radiounit label="{xen
<xen
<xen
<xen
<xen:label>{xen
<xen:textbox placeholder="{xen
</xen
</xen:radiounit>
<xen:checkboxunit label="">
<xen
</xen:checkboxunit>
</fieldset>
</xen:foreach>
<xen:submitunit save="{xen
</xen:form>
The code shown in red is what I use on my forum. If you don't have any custom user fields then delete this code. Otherwise if you wish to show your own custom user field code(s) which are filled in during registration, you will want to use my example and edit the template code to match your custom user Field ID names. For example change "name" and "motorcycle" to Field ID's that you use.
Database:
A table called xf_register_location is created in your database.